Welcome to the final blog in our series on Schedule Risk Analysis. Over the past few weeks we’ve explored the topics of schedule integrity, uncertainty and three-point estimating, and running analysis. To round off, we’re going to talk about the importance of setting up a robust Risk Register.
Setting Up A Risk Register
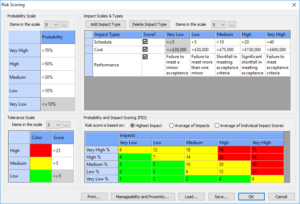
When creating a risk register it is very tempting to just get all the risks input. However, you need to clearly work out how you are going to score and work with all your risks before you start identifying them.

Probability Scale:
How many levels of probability do you want? Just three levels at High, Medium and Low or perhaps more. As well as words you also need to identify what percentage probability each word means, someone who is very optimistic might say a High Probability is 80% whereas as pessimist may say High is 50%. You therefore need to create a clear percentage boundary against each probability level.
Impacts and Impact Scale:
Just as with probabilities you need to work out how many levels of impact you want and also what impacts you want to measure. You have the standard cost, schedule and performance, but do you want to add any others such as Reputation?
Tolerance Scale:
This allows you to colour each risk according to its total score.
Manageability and Proximity:
You may also choose to score your risks based on how easy they are to manage and how close they are in terms of timescale.
It is important to clearly define these attributes before attempting to identify and qualify risks. Otherwise, you may end up having to re-qualify them after you have changed scoring grids and matrixes, which would be doubling up your time and effort.
Categorising Your Risks
To make it easier to break down and categorise a risk register, use the RBS feature from the Edit menu to setup your own RBS (Risk Breakdown Structure) to use against each risk. You can then filter and report out on specific categories.
Setting Risk IDs
Before you start entering your risks you need to define a numbering system for them. In Primavera Risk Analysis use ‘Edit’, ‘Next Risk ID’ to do this.
User Defined Fields
Primavera Risk Analysis gives you the option to add in your own fields to populate over and above the standard fields, select ‘Edit’, ‘Edit User Defined Fields’ to set these up.
Once you’ve gone through and established the criteria and attributes you want to use, you can begin inputting your risks, safe in the knowledge that you’ve created a solid foundation for you to monitor and track them.
What’s Next?
We hope you’ve enjoyed our blog series exploring some of the key principles of schedule risk analysis using PRA.
If you missed the earlier blogs, here’s where you can find them:
Uncertainty Analysis and Three-Point Estimating
To learn more about the tool and be fully confident to use it on your programmes, Underscore Training offer a comprehensive two-day Primavera Risk Analysis training programme. To find out more about our course please click the following link Primavera Risk Analysis. For a full list of public programme dates please see our website, Public Programme Dates.
Alternatively, if you have a group requiring training we can organise dates to suit you.
Please feel free to get in touch if you have any questions by email on training@underscore-group.com.
Soft Skills: Why Being a Control Freak is Hurting Your Project Management Success
Are you a project manager who feels the need to be in control of every aspect of your project? While being detail-oriented and organised can be beneficial, it's important to recognise when your inner [...]
Project Management – the Accreditation Debate
With growing concerns about the skills gap in PM, we explore whether accredited courses are the best response to this challenge, or if they may be missing key skills that project managers need to [...]
Microsoft Project – It’s More Powerful Than You Might Think
Microsoft Project is a project planning tool that is widely used across businesses. It has a simple to use interface making it ideal for small single entity projects. Although because of this, it’s developed [...]
Understanding and Building Relationships
Whether we like it or not, we all rely on other people to get things done, and this means that the way we interact with others has a powerful impact on how smoothly our [...]
Skills for Project SUCCESS
If you’re a project manager, project success is probably the one thing you think about day in day out. More specifically, you probably worry about how you can make sure your project(s) gets completed [...]
Primavera – It’s not as scary as it sounds
Complicated, confusing and complex; those are just some of the words that often spring to mind when discussing the topic of Primavera. But is this really the case? Is Primavera as scary as it [...]


