Microsoft Project is a project planning tool that is widely used across businesses. It has a simple to use interface making it ideal for small single entity projects. Although because of this, it’s developed a reputation for only being useful for basic projects and many planners and project managers incorrectly assume that it’s not as powerful as some of the more expensive tools. However, it is a very effective tool, including advanced features such as resource planning and resolving overallocations, a team planner, detailed resource profiling including custom contouring, cost escalation and multiple resource rates to name a few. The trouble is that most people just don’t know how to make the most of it or aren’t aware of all of the features it offers.
Below we look at some of the key features that you might be missing out on when setting up your project.
Setting Up Your Project
The danger of Microsoft Project is that people tend to open it up and immediately start on a list of activities. It is important to properly setup and structure the project before you even think about activities. (This is where having a qualified planner in post is also important, but that’s a topic for another day.)
The first things to do are to set your working time and project options. Working time allows you to specify the hours being worked across the day on activities and project options specify the project defaults. Project defaults include things such as default start and end time for activities and importantly the hours per day. Whenever you schedule activities in days, weeks or months, it converts this to hours behind the scenes, so it is crucial that these are set correctly from the beginning. Otherwise you will end up with an incorrect schedule.
The next thing to do is to set the start date of the project so you are scheduling from the correct point.
Work Breakdown Structure (WBS)
You are now ready to build your work breakdown structure. This is a really important step as it allows you to break your work into manageable chunks and also builds your reporting structure. This is best done on paper first so that you can really structure your project properly. In Microsoft Project this is done by putting your top level tasks into the task list. These are called Summary Tasks.
Activities
Once you have completed your list of summary tasks you now need to add in activities to complete your Work Breakdown Structure. These define what needs doing, when and by whom. At this stage we would define activities and milestones that we would use to track and manage the project.
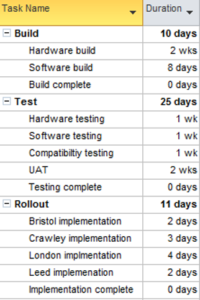
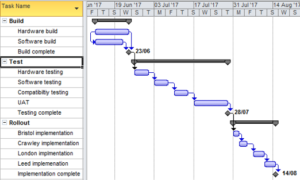
Creating Dependencies
It is really important to properly structure and link your activities. This allows you to show which is dependant on which and the order things need to be done. Once completed this will give you a completed gantt chart with a critical path so you can track work complete.
Learn more
Hopefully we’ve convinced you that Microsoft Project has a lot more to offer than you might think. If your interest has been piqued and you’re keen to learn more, why not book onto our upcoming Microsoft Project – Planning and Control course running 1st-2nd February 2023 (two half day sessions run virtually). We’ll be covering all of the points discussed above and much more. Click here to view the full course outline, or get in touch to find out more and book.
And if you think you could benefit from learning more about planning in general, we also offer courses on project planning and control. Talk to us about your learning objectives and we can help you find the right course for you.
Read Next

Soft Skills: Why Being a Control Freak is Hurting Your Project Management Success
Are you a project manager who feels the need to be in control of every aspect of your project? While being detail-oriented and organised can be beneficial, it's important to recognise when your inner [...]

Project Management – the Accreditation Debate
With growing concerns about the skills gap in PM, we explore whether accredited courses are the best response to this challenge, or if they may be missing key skills that project managers need to [...]

Understanding and Building Relationships
Whether we like it or not, we all rely on other people to get things done, and this means that the way we interact with others has a powerful impact on how smoothly our [...]

Skills for Project SUCCESS
If you’re a project manager, project success is probably the one thing you think about day in day out. More specifically, you probably worry about how you can make sure your project(s) gets completed [...]

Primavera – It’s not as scary as it sounds
Complicated, confusing and complex; those are just some of the words that often spring to mind when discussing the topic of Primavera. But is this really the case? Is Primavera as scary as it [...]

Four Top Tips for Successful Communication
Understanding Communication skills Whether we like it or not communication is part of our lives, it’s the linchpin of our society, and yet despite its immense importance, it’s astounding how often people get it [...]